Thursday, October 31, 2013

Witches Night Out

Every October, I host a witch party at my house for the girls I grew up with.  It's just a fun way to get together for a girls night.  The only requirement is to wear a witch hat…it actually looks pretty funny from outside, seeing a bunch of pointy hats through the window :)

 Here is how I decorated the table this year:


The chair sashes were from Shindigz; they come in a set of 10.  The web tablecloth is just a piece of sheer fabric I bought from JoAnn's in their Halloween section and it is just draped over a plain black tablecloth that I got along with the matching napkins at Bed Bath and Beyond.


The centerpiece I picked up at Pier 1 Imports (my favorite store) and I placed some purple glitter balls around it for extra sparkle.  The candleholders were from Michael's arts and craft store.


The glasses are my absolute favorite!  The are The Season of the Witch Goblets from Kirk's Folly.    I do not think they are available anymore, but they do have other goblets.  They are nice and heavy and so much detail on the base.  The pictures do not do them justice.  Inside each glass I placed a flashing pumpkin drink light available at Amazon.


The plates I got a couple years ago at Home Goods.  I am always on the lookout for these but I have yet to come across them.  The napkin rings are really purple beaded bracelets that I wrapped around the napkins like you would a ponytail.  I got them, as well as the witch hat place card holders and the chargers, at Michael's.  The spider web placemat I picked up for a steal at Big Lots.


To finish off the bottom of the table, I decorated the legs of table as witch feet.  It's really just a pair of knee high socks and a child's size shoe covers found at Party Fair.  I'm sure any Halloween store would stock these.


And the witch party wouldn't be complete without some wands.  I made these for the girls out of wood dowels, irridecent glass beads (that you use in the bottom of a vase), hot glue and paint.  I used this tutorial as a starting point for the wands.  Instead of painting the entire wand one color, I painted the hot glue designs in a different color, then did a wash (black paint mixed with water painted over the entire wand and then wiped off with a paper towel) and painted coordinating glitter paint on the designs.  I sealed the whole thing with acrylic spray.


We had a lot of laughs the entire night and we can't wait for next year's Sisterhood of the Traveling Broomstick.  If you've never hosted a witch party, I suggest you do so!  It really is a lot of fun :)


Monday, October 14, 2013

Homemade Laundry Detergent


Recently while I was totally procrastinating doing some research on Pinterest, I came across a pin for DIY laundry detergent.   At first I was a little skeptical, especially seeing real life attempts at some pins such as here.  But the more I researched, the more I thought of giving it a go.  After all, I go through so much detergent at home and this is supposed to last a year (which I personally think is a bit stretched).  It costs just under $30.00 for all the ingredients.  I found everything in Wal-Mart in the laundry isle.  I also bought two glass jars for my laundry room, one scented and the other unscented.  The cost was $9.00 each, one large one was $17.00.  So here is the step by step of how to make the batch.  

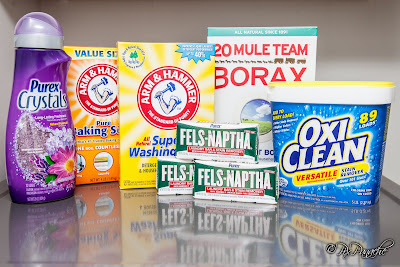
Ingredients:

One box of Borax (just over 4 pounds)
Three bars of Fels-Naptha, Zote, or Ivory soap. 
One 4 pound box of Arm & Hammer Baking Soda.
One box of Arm & Hammer Super Washing.
4 pounds of Oxy Clean (I bought the large one since it was cheaper but didn't use it all)

Laundry Scent Crystals in your favorite scent.

Instructions:
Cube the soap into small cubes and divide in half.


Take half of the soap and put in a food processor.  Some recipes call for grating the soap, but I've read that sometimes it will leave some in the washer if the flakes are too big.  So I have an old Ultimate Chopper that worked perfectly for this.  Note:  add some of the powder to the food processor before grating.  This is make sure the soap grinds into a fine powder.  Otherwise, the soap will be too moist and start to clump.  We don't want clumps.  Clumps are bad.


Pulse the processor a few times and then run on high until all the soap is ground.  It should look like the picture below.


Next, take all ingredients outside to mix in a large bucket.  I used one of those party buckets that I use for beer soda and ice.   The reason you want to do this outside is because when you dump all the powder and mix it together, it tends to fly around.  Nothing like choking on soap powder.  Put all ingredients except the scented crystals into the bucket and mix together.  I used an old piece of molding, but a large paint stick from Home Depot or Lowes would work great.


Now here I took approximately half of the mixture and filled one of the glass jars.  I love those scented crystals from Downey, Purex, and Scentsy (Scentsy is only bought online, so I linked to where I got it from).  I wanted half the soap batch unscented so if I wanted to add a different scent, I could.

Next, I added the scented crystals to the mix and then filled the other glass jar.   


To use, add 1 - 2 tablespoons to your wash.  

I have an he machine and I add the soap directly to the drum.  I've read several people say it starts to cake in the dispenser after a while.  Don't know if it's because the soap wasn't grated finely enough, but I don't intend to find out.  

NOTE:  After filling the jars, you may want to add a silicon packet or some rice tied in cheesecloth to prevent the soap from drying out and getting hard over time.  This will pull any moisture out of the mixture, especially since it will be in the laundry room.